Building and Running Vitis-AI Sample Designs on the Kria SOM with Certified Ubuntu
Introduction
In 2021, Xilinx introduced the Certified Ubuntu Distribution for Kria SOM and other Xilinx boards. On the main landing page for certified Ubuntu, there are getting started instructions as well as a procedure for running a Natural Language Processing example. This provides a pleasant out-of-box experience that allows you to experience machine learning on Xilinx products quickly and easily.

Figure 1: Simplified flow from "out-of-the-box" to developing your own application
This article will walk through the next step. That is, how to compile and run Vitis-AI examples on the Xilinx Kria SOM running the Certified Ubuntu Linux distribution. This is an important step that will move you towards programming your own machine learning applications on Xilinx products.
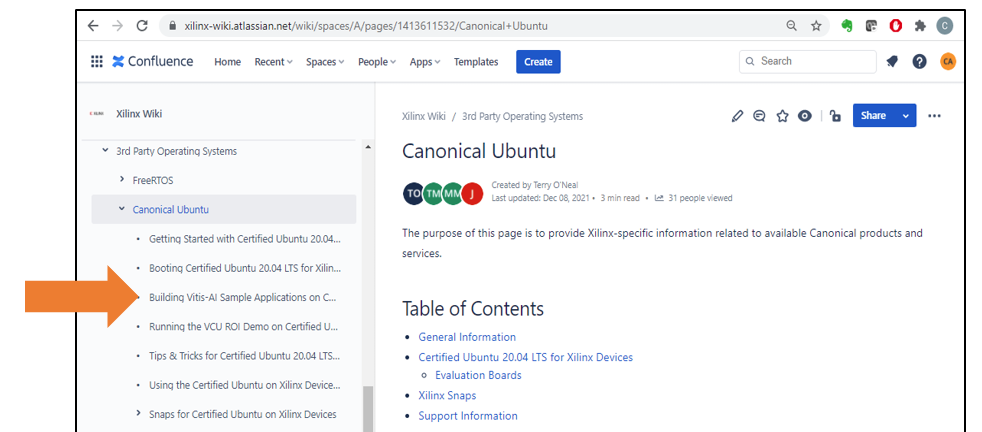
Figure 2: Certified Ubuntu WIKI page
This article assumes you’ve already run the NLP SmartVision example. If you haven’t, you will need to run the following commands to ensure your Kria SOMs environment is properly set up. This only needs to be done once.
    sudo snap install xlnx-config --classic
xlnx-config.sysinit
sudo xlnx-config --snap --install xlnx-nlp-smartvision
Vitis AI
Vitis-AI software takes models trained in any of the major AI/ML frameworks, or trained models that Xilinx has already build and deployed on the Xilinx Model Zoo and processes them such that they can be deployed on a Xilinx device.
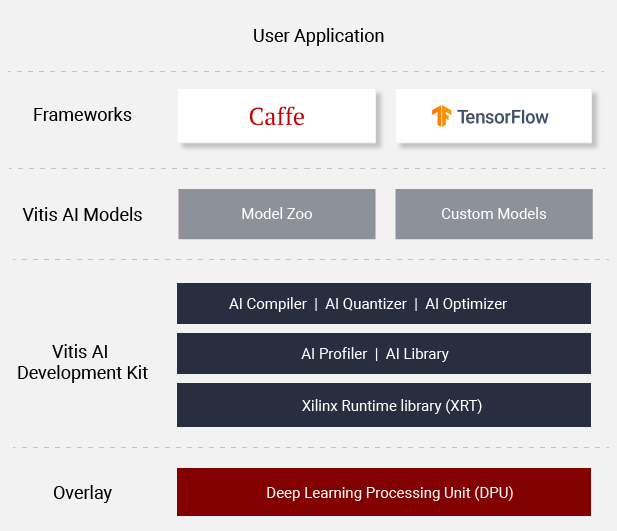
Figure 3: Vitis-AI Components
Vitis-AI contains a software runtime, an API and a number of examples packaged as the Vitis AI Library. The samples we’ll be building are from the Vitis AI Library.
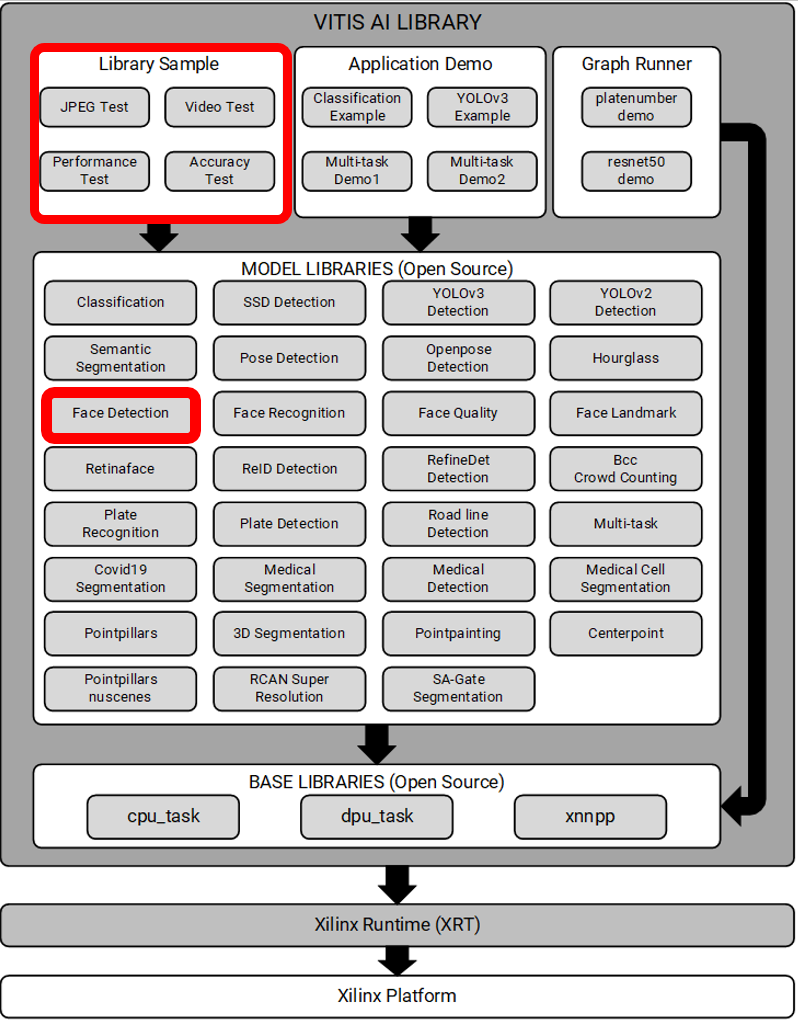
Figure 4: Vitis-AI Library Contents
Install Vitis-AI Library Samples
When you set up and ran the NLP example design, you loaded the Vitis-AI libraries. Each of these libraries is documented at Vitis AI Library Guide.
What was not installed when you ran the NLP example are the associated sample designs, the “Library Samples” in Figure 3. We will install them now.
    cd ~
git clone https://github.com/Xilinx/Vitis-AI.git
cd Vitis-AI
git checkout tags/v1.3.2
This download repository of Vitis-AI examples, reference code, scripts, a runtime, a few models, and some miscellaneous utilities.
The Library Samples are in the ~/Vitis-AI/demo/Vitis-AI-Library directory. Each sample is structured similarly and is set up such that it can be built, run and modified right on the SOM. Doing this is illustrative of working with Vitis-AI.
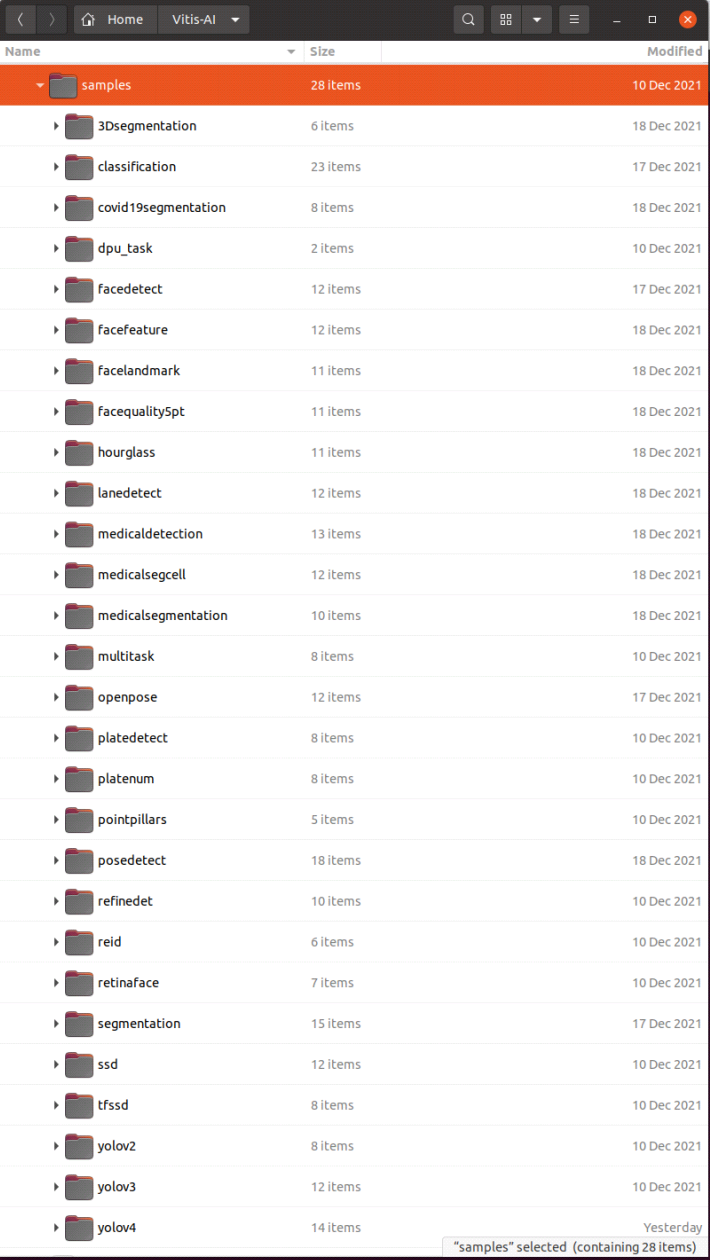
We will be working with the “facedetect” sample. Looking in that directory, we see the following:
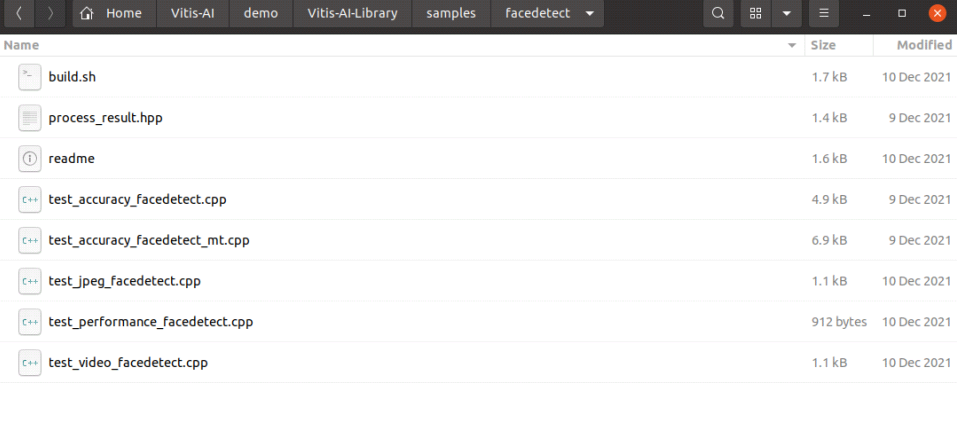
To get the full Ubuntu experience, it is recommended that you do the rest of these steps from a terminal window in the Ubuntu desktop.
A build script is provided that builds each application. Let’s examine the compiler command for one of the applications from the build.sh file:
    $CXX -std=c++17 -I. -I/usr/include/opencv4 -o test_accuracy_facedetect test_accuracy_facedetect.cpp -lopencv_core -lopencv_video -lopencv_videoio
-lopencv_imgproc -lopencv_imgcodecs -lopencv_highgui -lvitis_ai_library-facedetect
-lvitis_ai_library-model_config -lvitis_ai_library-math
-lvitis_ai_library-dpu_task -lglog
The Vitis-AI samples use just OpenCV and Vitis-AI libraries. To build the samples, run the build.sh script.

    cd ~/Vitis-AI/demo/Vitis-AI-Library/samples/facedetect
./build.sh
It builds quietly. You can always add a -v (for “verbose”) argument to the commands in build.sh to observe the build process.
After a few moments, it will finish. There are four new executables in the facedetect directory.
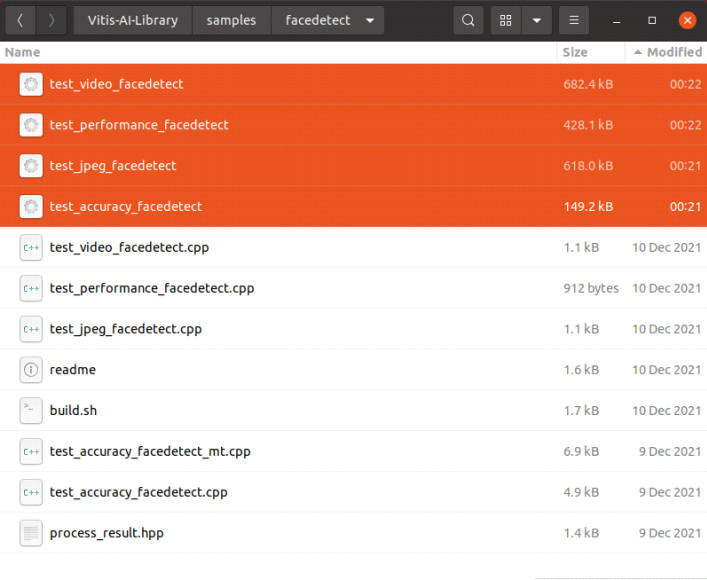
    ./test_jpeg_facedetect, ./test_performance_facedetect, ./test_video_facedetect the first param followed must be followed with model name.
  Valid model name:
    densebox_320_320
    densebox_640_360
Any model called out in the readme of any of the Vitis-AI samples is available for download from the Xilinx website. To download them, change to your home directory (cd ~), and download the model by building a “wget” command as follow:
    wget https://www.xilinx.com/bin/public/openDownload?filename=<build_filename> \
-O ~/<target_filename>
To build the filename, simply prepend the model name to the name of the DPU on the Kria SOM. The complete commands for densbox_320_320 and dense_box_640_360 would be:
    wget https://www.xilinx.com/bin/public/openDownload? \
filename=densebox_320_320-DPUCZDX8G_ISA0_B3136_MAX_BG2-1.3.1-r241.tar.gz \
-O ~/densebox_320_320-DPUCZDX8G_ISA0_B3136_MAX_BG2-1.3.1-r241.tar.gz

wget https://www.xilinx.com/bin/public/openDownload? \
filename=densebox_640_360-DPUCZDX8G_ISA0_B3136_MAX_BG2-1.3.1-r241.tar.gz \
-O ~/densebox_320_320-DPUCZDX8G_ISA0_B3136_MAX_BG2-1.3.1-r241.tar.gz
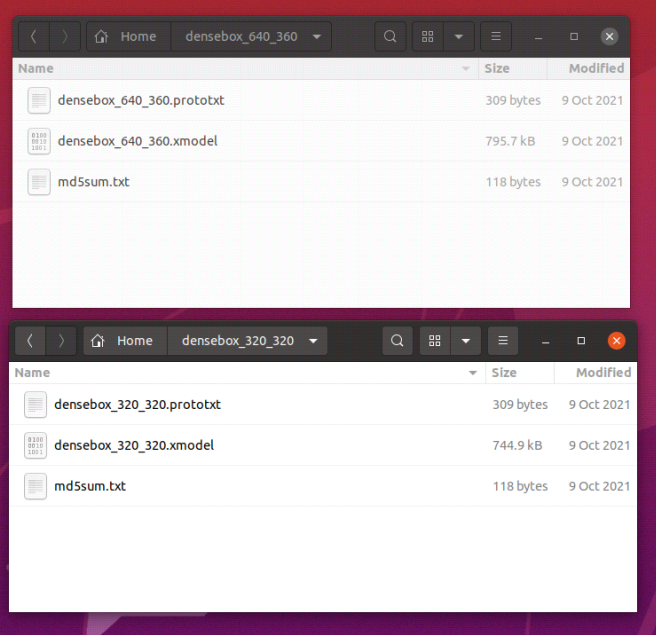
Once downloaded simply extract each model into a directory.
    tar -xzvf densebox_320_320-DPUCZDX8G_ISA0_B3136_MAX_BG2-1.3.1-r241.tar.gz
tar -xzvf densebox_640_360-DPUCZDX8G_ISA0_B3136_MAX_BG2-1.3.1-r241.tar.gz
The results should be as follows:
Configure Your SOM
Before we can run the Vitis-AI facedetect sample, we need to configure the SOM with the design (sometimes referred to as the platform) that includes the Deep Learning Processing Unit (DPU). This needs to be done each time power is cycled on the SOM.
The DPU is a configurable processor. It has a number of configurable features that allow the user to tailor the DPU to fit the application and the FPGA. The DPU features an instruction set intended to target the implementation of most convolutional neural networks.
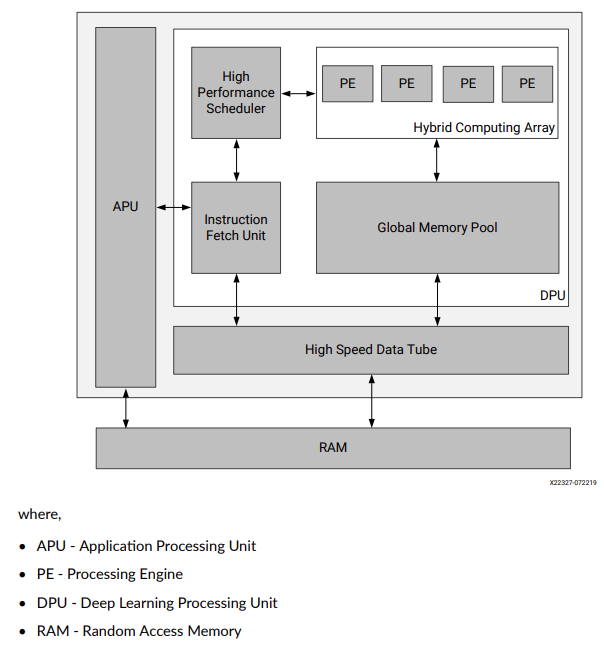
There are several “base-level” DPUs, each supporting a different amount of raw compute: B512, B800, B1024, B1152, B1600, B2304, B3136, and B4096 from 512 MOPs in the B512 to 4GOPS in the B4096. The design used here is the B3136, so it’s a 3.136GOPS compute.
The platform design shown in Figure 5, is called kv260_ispMipiRx_DP. There is more information on that design here.

Figure 6: Platform design used for Vitis-AI Samples
To load the design, we are going to use the SOM “xmutil” utility.
    sudo xlnx-config --xmutil unloadapp
Response:  Accelerator successfully removed.

sudo xlnx-config --xmutil loadapp nlp-smartvision
Response: Accelerator loaded to slot 0
“xmutil” is a utility for SOM platform management. More information on xmutil and its use is here.
A “quick-and-dirty” way to confirm you’ve correctly loaded a platform, and that it has a DPU is to run the “show_dpu” utility.
    show_dpu

Response: device_core_id=0 device= 0 core = 0 fingerprint = 0x1000020f6014406 batch = 1 full_cu_name=DPUCZDX8G:DPUCZDX8G_1
Fingerprint is a number that corresponds to the various features included in the DPU. These features are documented in the DPUCZDX8G Product Guide.
Run test_jpeg_facedetect
We are now ready to run face detection. Test_jpeg_face_detect sends a single image through the face_detection network, draws a bounding box around it, and saves it to a file. Ensure you have a jpeg image in your local directory and execute the command
./test_jpeg_facedetect ~/densebox_320_320/densebox_320_320.xmodel file.jpg
The resulting image will be written to file_result.jpg and will look something like this:
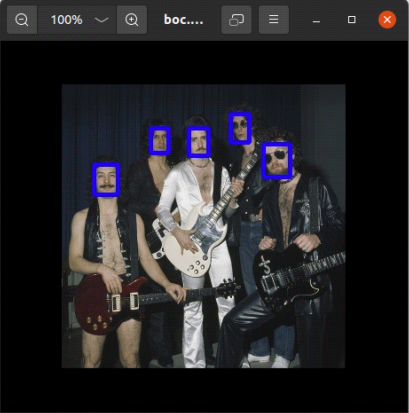
Figure 7: Illustration of densebox_320_320 face detection.
Run test_performance_facedetect
The test_performance_facedetect application should be run with the following arguments:
    ./test_performance_facedetect -l <log_file_name> -t <num_of_threads> -s <num_of_seconds>
<image list file>
For example:
    ./test_performance_facedetect ~/densebox_320_320/densebox_320_320.xmodel file_list.txt -t 1 -s 5
…
FPS=182.948
E2E_MEAN=2728.34
DPU_MEAN=1532.74

./test_performance_facedetect ~/densebox_320_320/densebox_320_320.xmodel file_list.txt -t 2 -s 5
…
FPS=325.552
E2E_MEAN=3067.55
DPU_MEAN=1874.26
Run test_video_facedetect
To run test_video_facedetect, execute the following command from a command window on the Ubuntu GUI. This first example assumes a USB camera connected to the Kria SOM.
    test_video_face_detect ~/densebox_320_320/densebox_320_320.xmodel 0
test_video_face_detect ~/densebox_640_360/densebox_640_360.xmodel 0
Note that the trailing 0 in the above command represent the device number for the USB camera you’re your USB camera might be different. Execute the command
v4l2-ctl --list-devices
to display a list of video devices (look for /dev/video*)
    ubuntu@kria:~/densebox_320_320$ v4l2-ctl --list-devices
isp_vcap_csi output 0 (platform:isp_vcap_csi:0):
	/dev/video2

Xilinx Video Composite Device (platform:xilinx-video):
	/dev/media1

UVC Camera (046d:0825) (usb-xhci-hcd.1.auto-1.1):
	/dev/video0
	/dev/video1
	/dev/media0gh43n jk
If you prefer to feed a video through the network, the command is slightly different. The video needs to be in .webm format. For example, the command will do face detection on the video file video.webm
test_video_face_detect ~/densebox_640_360/densebox_640_360.xmodel video.webm
What's Next
This article showed how to quickly download, build and run face detection on Xilinx hardware. The Vitis-AI library includes over 20 other samples that are structured in exactly the same way. Try another sample that is perhaps more in line with your machine learning needs. Following that, start exploring the source code, thinking about what modifications you might make that will help you solve your real-world design problems. You’re well on your way to using machine learning with Xilinx.

About Craig Abramson
Craig Abramson has been with AMD close to 25 years, most of them as Field Applications Engineer. Now in marketing, he is passionate about gaining and sharing knowledge about machine learning and its applications at the edge. Outside of AMD he writes and plays music and, like so many others during the pandemic, started a music podcast that has so far been enjoyed by thousands of listeners around the globe.