ML Caffe Segmentation Tutorial: 6.0 Running the Models on the ZCU102
6.0 Running the Models on the ZCU102
The final step in this tutorial is to run the models on the target hardware - in my case, a Zynq® UltraScale+™ ZCU102, but other development boards may also be used (just make sure you changed the dnnc command when compiling the model to target the correct DPU associated with your board). In order to expedite the process for running on the target hardware, I have included software applications for each model that allow you to perform two different types of tests:
Test the model using a video file and display the output. By default, this uses a 512x256 input size, and a video file titled "traffic.mp4" has been included under ZCU102/samples/video directory. The software application in the "model_name_video" (e.g. enet_video) subfolder can be used to test the model with this video file.
Run forward inference on the model using the cityscapes validation dataset and capture the results for post processing back on the host machine. This uses a 1024x512 input size by default to match the mIOU tests that were done on the host previously, but other input sizes may also be used. The results of running this software application will be captured under the software/samples/model_name/results folder. The software application in the "model_name_eval" (e.g. enet_eval) subfolder can be used to perform this test.
In order to run the tests, it is assumed that you have a ZCU102 revision 1.0 or newer connected to a DisplayPort monitor, keyboard and mouse, and an Ethernet connection to a host machine as described in step 1.1. Then perform the following steps:
- Copy the cityscapes validation images into the ZCU102/samples/cityscapes folder on your host machine. After this you should have a directory structure that looks like the following:

2. At this point you can either copy over your compiled model .elf file (output of dnnc) into the model subdirectory such as ZCU102/samples/enet_eval/model/dpu_segmentation_0.elf, or use my pre-populated models that have already been included in that directory. Note that the makefile assumes the name of the .elf file is "dpu_segmentation_0.elf" and it also assumes that you used the name "net=segmentation" when compiling the model with dnnc. You can see this in the ZCU102/samples/enet_eval/src/main.cc files for each of the associated applications.
3. Boot the ZCU102 board
4. Launch the Linux terminal using the keyboard/mouse connected to the ZCU102
5. Configure the IP address for a compatible range with your host machine (I use 192.168.1.102 and then set my laptop to 192.168.1.101). The command needed to perform this step is:
ifconfig eth0 192.168.1.102
6. Launch a file transfer program - I like to use MobaXterm, though others such as pscp or WinSCP can also be used.
7. Transfer the entire samples directory over to the board
8. Change directory into one of the video based examples such as 'enet_video'
9. Run make clean, then make -j4 to make the sample application. This will compile the ARM application and link in the DPU model (located under the models subdirectory) with the ARM64 executable to run on the A53 cores.
10. To execute the application, use the following command:
*for the _video applications
./segmentation ../video/traffic.mp4
*for the _eval applications
./evaluation
When running the video application, you should see the video play back with overlays that color code the various classes from the scene onto the monitor. After the playback is completed, an FPS number will be reported in the terminal which summarizes the forward inference performance from the hardware run.
When running the evaluation application, you should see a list of the validation images on the console being read into DDR memory, then the text Processing, after which there will be delay while forward inference is run on the images. The final output will be 500 images with the class labels for pixel values stored into the results directory. These images can then be post processed back on the host machine to extract the mIOU score for the model.
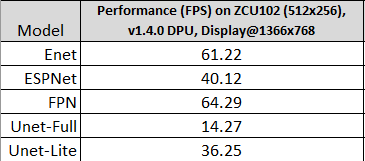
I have observed the following performance using the pre-trained models on the ZCU102:

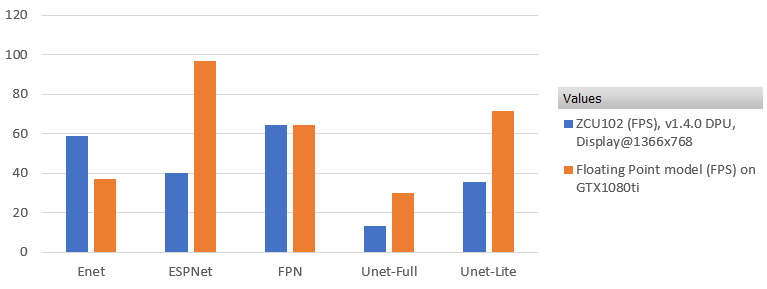
Using data gathered throughout this tutorial, we can compare the performance of the ZCU102 vs. the GTX1080ti graphics card that was used to time the models from section 4.1. Albeit, this isn't a fair comparison for two reasons:
- We are comparing an embedded ~20W device with a 225W GPU
- The ZCU102 execution time includes reading/preparing the input and displaying the output whereas the GPU measurement only includes the forward inference time of the models
That said, this still provides some data points which are useful to garner further understanding. The following chart shows a comparison between the FPS as measured on the ZCU102 vs. the GTX1080ti.

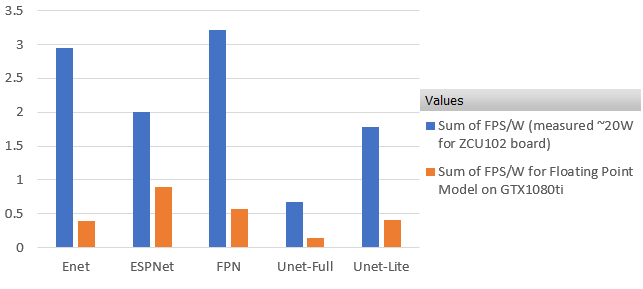
What is perhaps a bit more useful than comparing raw FPS, however, is to compare FPS/W (performance/Watt) as this is a more generic comparison of what performance is achievable for a certain power cost. Bear in mind, this is still not a fair comparison due to reason 2, but the value of a Xilinx SoC starts to shine a little more in this light. In reality the advantage is even more pronounced if only the DPU throughput is considered.
In order to perform this comparison, ~20W was measured on the ZCU102 board during forward inference, and the nvidia-smi tool was used to read the power during forward inference of each of the models as part of section 4.1. The comparison between the two can be seen in the following figure.

The same data can be seen in table format below:

At this point, you have verified the model functionality on the ZCU102 board and the only step left is to post process the images if you ran the evaluation software. The mIOU score from this can then be compared the mIOU that decent_q measured previously on the host machine. In order to do this, proceed to the final step, "7.0 Post processing the Hardware Inference Output".

About Jon Cory
Jon Cory is located near Detroit, Michigan and serves as an Automotive focused Machine Learning Specialist Field Applications Engineer (FAE) for AMD. Jon’s key roles include introducing AMD ML solutions, training customers on the ML tool flow, and assisting with deployment and optimization of ML algorithms in AMD devices. Previously, Jon spent two years as an Embedded Vision Specialist (FAE) with a focus on handcrafted feature algorithms, Vivado HLS, and ML algorithms, and six years prior as an AMD Generalist FAE in Michigan/Northern Ohio. Jon is happily married for four years to Monica Cory and enjoys a wide variety of interests including music, running, traveling, and losing at online video games.