Storage Performance Development Kit (SPDK) On Zynq UltraScale+ MPSOC
Introduction
Is an NVMe storage device the bottleneck in your system? Maybe the Storage Performance Development Kit (SPDK) is your next step to increase the overall system performance by focusing on your NVMe storage performance.
The SPDK is an open source project designed for Linux user space. The Data Plane Development Kit (DPDK) is used by the SDPK. The SPDK was an Intel project prior to becoming an open-source project such that the X86 platform was its primary platform.
There are two reasons that you might be interested in the SDPK. The first and most obvious reason is for performance. A second reason could be the need for a more permissive license than the Linux kernel license.
The following paragraphs describe a prototype system using the SPDK with MPSOC on the Xilinx ZCU106 board. The ZCU106 platform is a PCIe root complex using an SSD as an NVMe PCIe endpoint. Basic functionality was the only goal of this prototype.
Expectations
This document is not designed to be a tutorial for any specific element, such as Linux or PetaLinux, but is intended as an aid to make the prototyping process easier. This document is not intended to be a step-by-step recipe with every command but is intended to be like a lab notebook description.
Test Environment
The Xilinx 2019.1 release is used for all builds with Xilinx tools.
X86 Platform
A 64 bit X86 PC is used for early testing of the SPDK, as it is quick to verify the build and test process using the same NVMe SSD as the embedded platform. The SPDK documentation is good for this early testing. The SPDK builds natively on an X86 PC easily which speeds the prototyping process.
Embedded Platform
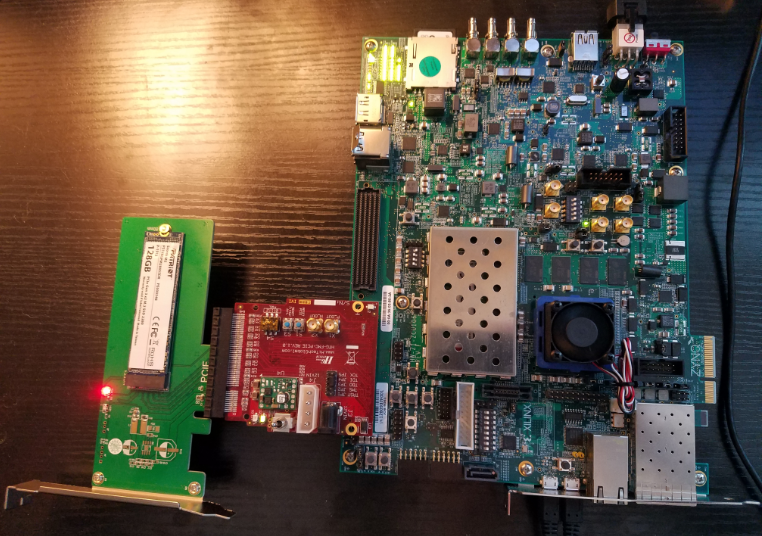
The Xilinx ZCU106 board is designed to be an end point, as it has an edge connector. For this prototype the ZCU106 board is used with a High Tech Global adapter for the FMC to PCIe host connector. The ZCU106 board requires the use of PL PCIe rather than PS PCIe. The ZCU106 with PL PCIe is used to allow visibility into the PCIe transactions (which is more challenging with the PS PCIe).

NVMe SSD
A Patriot M2 NVMe 128 GB SSD is used for testing in a generic PCIe x4 to NVMe M2 carrier board.
Vivado System
A hardware design for the ZCU106 is generated with XDMA PL PCIe and hardware coherency. Based on testing, the X86 system operates as a hardware coherent system, such that the SDPK does not perform cache maintenance operations. MPSOC defaults to a software coherent system, and must be changed to be hardware coherent to work with the SPDK.
The AXI Interconnect for the master port of the XDMA PL PCIe is set up for hardware coherent transactions based on the following wiki page:
https://xilinx-wiki.atlassian.net/wiki/spaces/A/pages/18842098/Zynq+UltraScale+MPSoC+Cache+Coherency.
The following excerpt from the Vivado block diagram illustrates the method of adding constants to drive the axcache and axprot signals so that AXI transactions for the PL PCIe are hardware coherent.

The constants axcache=0b1011 and axprot=0b010 are used in the Linux system to cause read/write transactions to be hardware coherent and non-secure.
Embedded Software
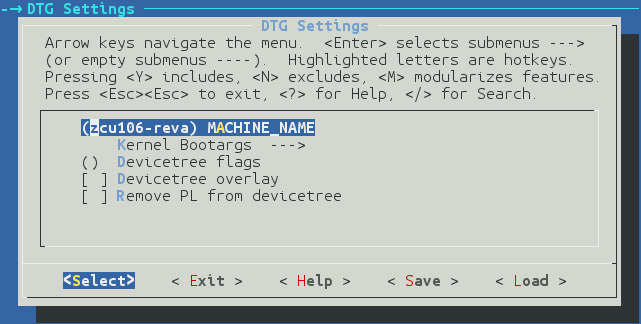
PetaLinux is used to build an embedded Linux system for the ZCU106 board based on an HDF file produced by Vivado. The device tree machine is set to zcu106-reva to use the features of the board such as the network and SD card.

Support for the GStreamer and VCU packages is turned off in the PetaLinux rootfs, to reduce the size and build time. As an alternative, the ZCU106 PetaLinux BSP could be updated using an HDF output from Vivado (petalinux-config --get-hw-description).
SPDK
The latest SPDK source code was used from the open-source repository.

Linux Kernel Configuration And Patches
NVMe Driver
Early testing of the prototype running the Linux kernel drivers verifies that the NVMe SSD is working prior to using the SPDK. The NVMe drivers are configured to be built into the kernel (CONFIG_NVME_CORE=y, CONFIG_BLK_DEV_NVME=y).
UIO for PCI
The UIO PCI driver is configured as a kernel module (CONFIG_UIO_PCI_GENERIC=m). The SPDK only works with this driver as a kernel module (rather than built into the kernel).
XDMA PL PCIe
The kernel is configured to include the driver for the PL PCIe (CONFIG_XDMA_PL=y).
Devmem
The ability to read/write DDR during debug is a good prototyping tool. Turn off devmem strictness to allow access to DDR for debug, as the SPDK uses buffers in DDR (# CONFIG_STRICT_DEVMEM).
PL PCIe Patch
The 2019.1 Xilinx release of the Linux kernel requires a patch for the PL PCIe driver. See Answer Record 72389 /content/xilinx/en/support/answers/72389.html and apply the patch to the kernel.
SD Card Preparation
Partitions
The SD card is partitioned with at least two partitions. The first partition is a FAT partition for the normal Xilinx boot files. The 2nd partition should be a Linux partition for the rootfs. A 16 GB SD card will have plenty of free space. The following illustration shows a typical set of partitions for the SD card created by the fdisk utility.
Format the SD card partitions using the appropriate mkfs utility for each partition.
Petalinux Build
Rootfs
Self Hosted Package
PetaLinux includes a self-hosted package which provides most of the needed tools, such as GCC and make, to build the SPDK. Enable the following packages in PetaLinux (petalinux-config -c rootfs) to allow the build and debug of multi-threaded applications.
Additional Packages
Enable the libaio and kmod (modinfo utility) packages in PetaLinux (petalinux-config -c rootfs) as they are required for the build and execution of the SPDK.
The cunit package is also required in the rootfs, but is not part of the PetaLinux menu system, and it must be enabled manually. Edit the <project>/project-spec/meta-user/conf/petalinux-bsp.conf file and add the following line to the file:
IMAGE_INSTALL_append = " cunit cunit-dev"
Note: The cunit package is required by the unit tests in the SPDK. As an alternative to building the cunit package, the SPDK can be configured to not build the tests with the following command line:
zcu106$ ./configure --disable-tests
Booting Rootfs From SD
PetaLinux defaults to an initramfs rootfs which works well for smaller rootfs. As the rootfs get large it becomes more challenging such that putting the rootfs on the SD card works better.
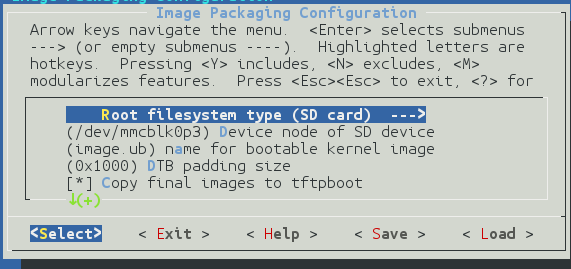
Alter the PetaLinux top-level configuration (petalinux-config) to boot from the desired Linux partition on the SD card. The following illustration shows using the 3rd partition for the rootfs:

Copying Rootfs To SD
PetaLinux provides multiple rootfs images for the SD card. The rootfs.tar.bz is used for the prototype as illustrated below:
$ sudo tar xvjf rootfs.tar.bz2 -C <sd card mount point>
$ sync
Coherency Software Setup
Hardware coherency requires both hardware and software changes. The “Register Write At Early Boot” section of the following wiki page was used to setup the coherency in the software:
https://xilinx-wiki.atlassian.net/wiki/spaces/A/pages/18842098/Zynq+UltraScale+MPSoC+Cache+Coherency.
BIF File Changes
After the PetaLinux package command (petalinux-package --boot) command has been executed for a normal BOOT.BIN generation, a bootgen.bif file exists in the build directory of the project. The BIF file is used by bootgen to create BOOT.BIN.
Copy bootgen.bif from the build directory into the images/linux directory of the PetaLinux project. Edit the file to remove paths to files such that it will use the files in the images/linux directory. Add the “[init] regs.init” line to the file as illustrated in the example below:
the_ROM_image:
{
[init] regs.init
[bootloader, destination_cpu=a53-0] zynqmp_fsbl.elf
[pmufw_image] pmufw.elf
[destination_device=pl] design_1_wrapper-coherent.bit
[destination_cpu=a53-0, exception_level=el-3, trustzone] bl31.elf
[destination_cpu=a53-0, exception_level=el-2] u-boot.elf
}
Register Initialization
The BIF file created in the previous step references a file named regs.init which allows early register initialization. Create this file with the following contents in the images/linux directory of the PetaLinux project.
.set. 0xFF41A040 = 0x3;
Setting the broadcast inner bit of the LPD_SLCR register turns on the broadcast of inner shared transactions from the inner domain to the outer domain, and enables hardware coherency.
The details of this register initialization are described on the referenced wiki page.
BOOT.BIN Generation
PetaLinux is used to generate the BOOT.BIN using the new bif file, with the following command assuming it is executed from the images/linux directory of the PetaLinux project.
host$ petalinux-package --boot --bif bootgen.bif --force
SPDK On The ZCU106
This step downloads, builds (natively), and runs the SPDK on the ZCU106. The network of the ZCU106 should be functional and is required for the following steps. Refer to the SPDK at https://spdk.io/ for documentation and details.
Download the Source
DPDK
The DPDK must be configured to build without NUMA support as MPSOC is not a NUMA architecture. The DPDK is copied from the SPDK in a nested directory to another non-nested directory to build outside the SPDK. This was done as it seemed to be the easiest way to be able to configure the DPDK for MPSOC.
zu106$ cp -Rd spdk/dpdk dpdk
zu106$ cd dpdk
zu106$ edit config/defconfig_arm64-armv8a-linuxapp-gcc adding the following lines.
CONFIG_RTE_EAL_NUMA_AWARE_HUGEPAGES=n
CONFIG_RTE_LIBRTE_VHOST_NUMA=n
zu106$ make config T=arm64-armv8a-linuxapp-gcc
zu106$ make -j 4
SPDK Build
Configure the SPDK to use the DPDK that was built outside of the SPDK. Then build the SPDK.
zu106$ ./configure --with-dpdk=<path>/dpdk/build
zu106$ make -j 4
SPDK Initialize
Initialize the SPDK to unbind the NVMe drivers and bind the uio_pci_generic kernel module.
zu106$ su
zu106$ ./scripts/setup.sh

Run Hello World
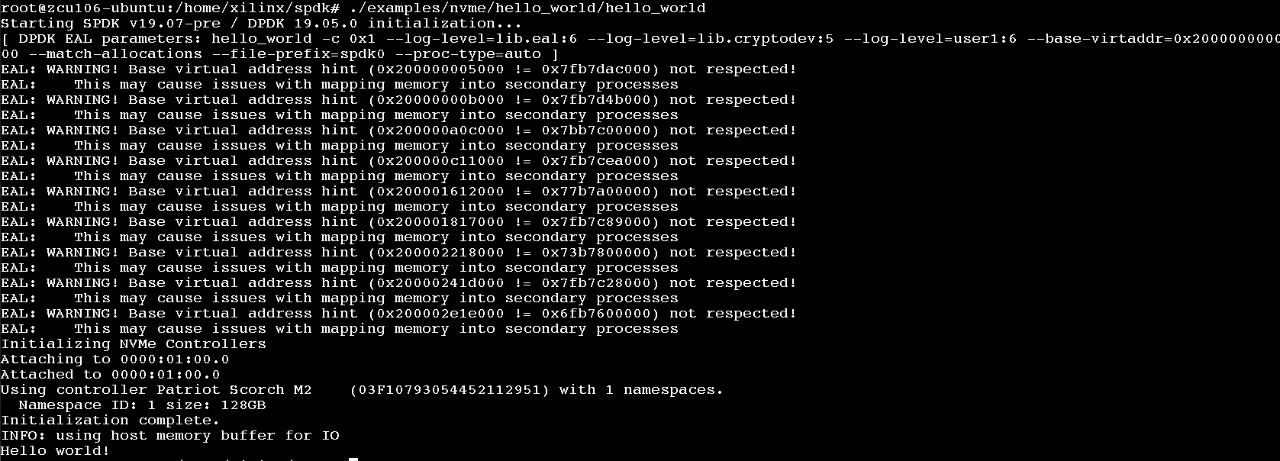
Run the hello world example with the typical results illustrated below.
zcu106$ ./examples/nvme/hello_world/hello_world

Prototype Challenges
The first hardware prototype with MPSOC was software coherent, which did not work with the SPDK. The hello world example would only time out and not function.
Stepping through the hello world example with GDB allows the data buffers to be touched such that they were flushed from the cache, and the response was seen in the response buffer.
The PCIe transactions for a software coherent system were also gathered using an ILA. The NVMe target reads from host memory to get commands from the command queue. The PCIe transactions verified that the NVMe target was getting all zeros when it read the Identify command from the ZCU106 memory.
Performance Baseline
There was no effort to build the system for performance. The following performance numbers were taken just as a baseline.
root@zcu106-ubuntu:/home/xilinx/spdk/examples/nvme/perf# lspci
00:00.0 PCI bridge: Xilinx Corporation Device 9118
01:00.0 Non-Volatile memory controller: Device 1987:5008 (rev 01)
root@zcu106-plpcie-106:~/spdk/examples/nvme/perf# ./perf -q 128 -o 4096 -w randread -r 'trtype:PCIe traddr 0000:01:00.0' -t 300
nvme.c: 884:spdk_nvme_transport_id_parse: *ERROR*: Unknown transport ID key 'traddr 0000'
Starting SPDK v19.07-pre / DPDK 19.05.0 initialization...
[ DPDK EAL parameters: perf --no-shconf -c 0x1 --log-level=lib.eal:6 --log-level=lib.cryptodev:5 --log-level=user1:6 --base-virtaddr=0x200000000000 --match-allocations --file-prefix=spdk_pid2879 ]
Initializing NVMe Controllers
Attaching to NVMe Controller at 0000:01:00.0
Attached to NVMe Controller at 0000:01:00.0 [1987:5008]
Associating PCIE (0000:01:00.0) with lcore 0
Initialization complete. Launching workers.
Starting thread on core 0
========================================================
Latency(us)
Device Information : IOPS MiB/s Average min max
PCIE (0000:01:00.0) from core 0: 100062.53 390.87 1279.13 703.37 12005575.48
========================================================
Total : 100062.53 390.87 1279.13 703.37 12005575.48
Conclusion
The SPDK system prototype is built and tested with a minimal amount of work as shown in the previous paragraphs. A hardware coherent system is the only hardware change required to support the prototype. The software for the prototype builds easily with a self-hosted system which is supported by PetaLinux. The SPDK documentation, located at https://spdk.io/doc/getting_started.html, provides all the details required for the prototype.
With a small amount of prototype effort, the SPDK can be evaluated as a system solution for potentially improving the overall system performance with NVMe based storage.

About John Linn
John Linn is a Strategic Applications Engineer based in the southern US. He is an embedded software engineer supporting customers globally for AMD across a wide range of fields including Telecom, A&D, and Automotive. John spent many years of his career working on BSPs and AMD device drivers for AMD IP along with the Linux kernel and U-Boot.